Over the past few seasons while fishing the beloved Salmon Fly Hatch on the Deschutes I wondered if I could improve upon the standard foam patterns that I have found so successful for many years. I thought about the potential issues I have with the current patterns. Such as, not being able to see them in dying light and the silhouette they cast to awaiting Trout. At 46 years old I am realizing I can’t see as well as I used to. This fact upped the ante for me in terms of why and how I needed to design my version of foam salmon flies.
With the primary issues of visibility and size in mind as well as a desire to make the fly look more realistic, I began to create prototypes. Knowing I need some sort of foam to float the fly without adding extra weight I had the perfect material in mind, foam Backer-rod.
This material is designed to fill large cracks in concrete and similar locations and then be covered over with caulking. It is readily available at home improvement box stores and comes in long coils so it is very affordable and easy to work with.
The material is extremely light and flexible and is unsinkable. I find it lighter than most commercial fly tying foams and it comes in the correct shape I need. Its only drawback is that it is soft and can be damaged. To address the durability issue I slip the backer rod into braided tubing which protects it and gives it a realistic-looking body and profile.
I tested that body system over a couple of seasons successfully and found the profile and floatability were great. However, I felt I could do more to address the weight of the fly. Most patterns use long-shank hooks which can add up in terms of weight/ float-ability and provide increased leverage for fish when fighting larger ones. So, for the 2021 season, I found a short-shank hook to tie the fly on completing the prototype design.
Finally, the time had come to test the final version of the fly. It was mid-May the first day of our 2021 trip and the reports from the fly shops were all positive that the hatch was on. We were floating out from Trout Creek but the weather had turned cold and it was overcast. Few fish were rising and fewer bugs were in the air. I tied the fly on and began casting and immediately I started to get slashing rises, but no takes. This was the pattern for the next hour or so with multiple fish coming up but none taking the fly. I began to wonder, was it the fly or the weather or something else.
So, in as scientific a fashion as I could. I tied on a typical well-proven pattern to test the fish. To my delight, I had no more success with the proven pattern than I did with my new one. I had markedly less fish rising to the smaller profiled proven pattern than I did with my new prototype. Emboldened by that knowledge I continued to fish my new pattern with confidence. Finally, the weather warmed and I began catching fish with the new prototype. It performed as expected, not only was it more visible to me but to the fish as well. I never lost a fish because of the hook, although I have to admit I also never hooked any monsters on this outing. So, if you find yourself in a situation where you need a little more visibility either for yourself or the fish or start hooking monsters where hook leverage plays a part. I hope you consider the SS Salmon Fly.
Hook: Owner Mosquito hook size 4
Body: Pearl round braided tubing , 1/4” foam backer rod colored with marker black top/ orange bottom.
Wing: White Poly-yarn
Legs: Barred orange silicone legs (1 leg cut in two per side)
Thorax: Burnt orange ice dubbing
Hackle: Black saddle
1. Make the body by cutting 2.5” of pearl round tubing and fusing one end with a flame.
2. Then cut 1” of the backer rod and push it all the way into the body.
3 Color the top of the body black and the bottom orange with a marker.
Step 1: Tie the body onto the hook, trim and put a drop of superglue on the wraps to keep it from rotating. Tie in the wing and then the crystal flash on top and trim.
Step 2: Tie in the legs onto each side of the body, secure the hackle and attach some dubbing to your thread and twist.
Step 3: Wrap the dubbing forward, and then wrap the hackle forward and trim. Wrap a solid head and finish with cement.
A selection of size #20-22 Colored Emergers.
Ten years ago, Nat Brumley had a wild idea. This retired school teacher of thirty years decided to start a business devoted to the sale of dry flies. But this wasn’t just another online shop selling imported patterns, Nate had a much bigger mission in mind. He believed that if he had the right blend of education, customer service and well-designed flies, he could entice anglers with a promise: the ability to harness the power of the dry fly and find fishing success unimaginable to most anglers. Of course, this was a bold claim and an even bolder decision to base a business on, but Nate was confident in the face of doubters and felt the time was right for reevaluating and reimagining our approach to fly fishing.
Ten years later, Dry Fly Innovations, based in Boise, Idaho is still going strong. And Nate is just as evangelistic about his mission today as he was 10 years ago. This apostle of the dry fly claims to have never, in 50-plus years of fly fishing, caught a fish on anything but a floating fly. A quick survey of this on-line business will reveal a combination of tools that he credits for his success: a catalogue of original dry flies, a few specific tying materials, two self-published books, instructional DVD’s, extensive fishing reports and a comprehensive subscriber-only blog. One will notice that Nate’s flies have mostly unfamiliar names: Colored Emergers, Humpilators, Adam’s Caddis, Searchers, Emperor Caddis, Bare-belly Caddis, Converters, Twofer Mayflies, Adam’s Stimulators, Black and Gold Stimulators and PMD Stimulators. Even the familiar flies such as comparaduns, cripples and no-hackles seemed to have a specific twist unique to Nate’s vision of what a fly should be.
Nate Brumly on the South Fork of the Boise River with a 26” rainbow caught on a size #20 BWO Twofer.
My introduction to Dry Fly Innovations occurred last fall when a friend and I were planning to fish the Owyhee in Eastern Oregon. An angler from that area told us about a skating technique using one of Nate’s flies, the black and gold Stimulator. Rather than tie a couple dozen of this oddly colored fly from a photo, we each ordered a dozen in several sizes and set off to the Owyhee.
The fishing that weekend was not great no matter what we used, but the flies we ordered were intriguing and did generate a few strikes. In addition to the Black and Gold, I also ordered a few other patterns such as the Searcher and several Colored Emergers accompanied by a few suggestions from Nate as to their use. Later, Nate sent me one of his books and gave me access to his fishing blog which is a subscriber only.
“If I can always find the solution with a dry fly, why would I choose anything else?” Nate poses this question to me during one of our phone conversations, after I ask him if he has ever considered or been tempted to use a nymph, streamer or wet fly. I then ask if he considers himself a dry fly purist, knowing this can be a negative phrase among fly anglers. There was no hesitation from Nate, “No, and I’m not even sure what ‘dry fly purist’ even means. I started fishing dry flies as a means of subsistence in my youth and never had a reason to use anything else. I didn’t learn about nymphs until I was 19-years old. When I speak at shows or to other anglers and tell them my story, I can see the skeptical look in their eye. I have met those who claim to be dry fly purists, but I don’t seem to share their values or motivations. I’m not fishing dry flies to impress anybody or because I think it’s a higher form of fly fishing. Neither do I judge other angler’s methods. I fish dry flies because that’s the way I learned to fish and I never had the need for any other type of fly.” Nate says the joy of fishing a dry fly is seeing the fish ‘eye to eye’ as they comes up for the fly, and if deprived of that experience, he doubts if he’d still be fly fishing.
As for the statistic that most fish feed 90% of the time under the surface? This fact doesn’t even phase Nate or get him to pause and consider a sunk fly. As far as Nate is concerned, the studies and stomach samples which prove this statistic do not specify when those sunk flies are eaten. It’s Nate’s suspicion that a lot of those insects are eaten in the process of emerging—mature nymphs or fully emerged adults moving to the surface using their adaptive methods to break through the meniscus. Nate says, “Rise forms are often very subtle and most go completely unnoticed by anglers because they just aren’t looking for them. I have the feeling that a lot of the studies are, in fact, talking about emerging insects on or near the surface film. I fish dry flies that do that.” Just in case you are wondering, Nate defines a dry fly as any fly with a protruding feature above the surface of the water.
Nate elaborates on his dry fly fishing experience with an anthropology of sorts about the way we have developed as anglers: “American anglers learn to fly fish by graduating from dry flies to nymphs and streamers. Most anglers catch their first fish on a dry fly, but when conditions get tough or there’s no hatch and bigger fish are desired, we are taught dry flies won’t work, so we switch to nymphs, wet flies and streamers.” Nate uses an interesting proverbial image here to capture the moment when an angler replaces a dry fly with a sunk fly: ‘sniping off the dry fly’. Nate explains, “Knowledge of these other techniques is fine, and I don’t disparage their use, I just never ‘sniped off the dry fly’”. As I listen to Nate, I get the feeling that there is a tragic element to his characterization, resulting from the loss of innocence in pursuit of a goal now measured quantitatively rather than qualitatively. If it’s true that Nate is an example of someone who stuck with the dry fly and walked through all the problems in order to let the dry fly experience go on, then he may have something new to say. At least, that’s where I got interested. In other words, Nate says, “Fly fishing cannot become mundane. I need my wits challenged. I’ve caught a ton of fish in my lifetime, so it’s not about catching fish anymore, it’s about catching fish in the face of the challenges and problems they present. Because I’ve stuck with the dry fly, those challenges have been great—vast, even. But no other way will do and if a fish can’t be caught on a dry fly, then I go home fishless or find another piece of water.”
I’ve heard similar fishing philosophy from other anglers, especially those from older generations who never learned or adjusted to using bead-heads, strike indicators, synthetic materials, and today’s specialized equipment. While their criticism of these techniques can be an affront to those of us who grew up using these methods, their point is well taken. They fish in the way they want to catch fish, not any way that catches fish. There is a qualitative difference between these two ideas which seems to generate a healthy discussion around fly fishing in general. If, as Nate argues, and most of us would agree, dry fly fishing is the most pleasurable way to catch fish, then the question about why we would use anything else raises an interesting challenge.
Nate follows up his characterizations about the loss of the original dry fly experience, “Most American anglers developed along a similar trajectory by rejecting the dry fly except in those very obvious times of surface feeding, and hunt for the biggest fish with nymphs and streamers. I’m always hunting for the biggest fish in the drink.” You may think of Nate as simple angler catching mostly few and small fish only during certain times of the year. According to Nate, and documented in his notebooks, books, and blogs dating back many years, nothing could be further from the truth. Nate continues, “Those of us who have stuck with the dry fly, and there aren’t many, have discovered a hidden world of fly fishing most anglers never get to see.”
Nate and I begin to delve into some of the nuanced differences experienced by a pure dry fly angler (a phrase I will use instead of dry fly purist) and the technical use of dry flies. “A dry fly angler has to be a hunter, with sharp perceptive abilities and the strength to move over a lot of water to find those perfect opportunities. I call it ‘running in slow motion’—you’re moving fast and at the same time observing the minutest of details for any detection of trout. My goal is the biggest fish in the river and to do that consistently with a dry fly, through every season and in all kinds of conditions, you have to understand big fish.”
Nate explained to me his thoughts about big fish and why so few anglers catch them on dry flies. “Big fish are in the cockpit and they are very smart. They see everything and are deeply connected to their environment in ways we don’t completely understand. Acknowledgement and respect for this fact is the first requirement for catching the biggest fish in the river. Approaching big fish and choosing the right fly requires absolute respect for their sensitivity. Most big fish opportunities are lost without the angler even knowing it. Compound this with the need for proper fly selection, leader and tippet choices and presentation, and the dry fly angler has their work cut out for them.”
Nate also understands the limitations of the dry fly: “High, off color water is a killer; you might as well go home or choose a different body of water. Fish are far more interested in eating all the worms, grubs and other meaty food forms rolling down the bottom of the river.”
Another limitation, according to Nate, is experience. “Experience is a great teacher, but you need a lot of experiences over many seasons to develop your skills. To avoid frustration, combine your fishing with good education. This way, when you are on the river you can draw from your learning to help solve certain fishing problems related to catching big fish.” Nate mentions how to conquer some of these fishing problems by paying attention to what he calls, ‘the enormous importance of the tiny details’, which includes proper selection and use of equipment, fly prep, identifying various rise forms, understand where and how fish live in a river or lake, understanding presentation and which fly to use over a big fish.
I ask Nate to tell me his favorite or most productive fly. “I don’t have a favorite fly. I use the fly that best matches the conditions of the hatch and what the fish prefer. During a hatch, insects are always evolving and you don’t want to get married to fishing a particular insect stage when the fish may be looking for something else. Changes in the field of food will, through observation, dictate which fly to use. Basically I have two kinds of flies: searchers and articulated flies” (Nate uses the word ‘articulated’ here to describe a fly which closely resembles the actual insect; it articulates all the features big fish are looking for). “Take my colored emerger, tantalizer or cripple; all articulated flies. These flies are designed to appeal to big fish by the way they ‘posture’ in the water—their angle of submersion. The tails of the colored emergers and cripples must suspend straight down (some at a forty-five degree angle) with only the top portion of the fly, or the wing, suspended above the water. At certain points within a hatch, big fish are looking for insects in a certain posture, particularly when they are in close proximity to the fish; anything lacking this posture gets passed up by the biggest fish. It is these tiny details, along with size, shape and color, which make the difference to a big smart fish—the one in the cockpit.”
I don’t recall Nate using the phrases ‘match-the-hatch’ or ‘selectivity’ in our conversation, and maybe that’s a good thing. Because even though I knew what he was talking about, I didn’t feel the weight of the dogma that accompanies those discussions. I think back to all the great flies tied in the match-the-hatch tradition by such well-studied anglers as Bob Quigley, André Puyans, and Swisher and Richards. I ask Nate if he had any influences in his tying or ideas. “Not really, I haven’t read any books nor am I very familiar with the tiers you mentioned. Everything I’ve done is rooted in my experience.”
The searcher patterns mentioned above are just what they sound like, flies to use when there is no hatch, and comprise the second approach to Nate’s fishing. “My fly fishing breaks down this way: I’m either fishing a hatch or I’m fishing holding water; I’m either fishing to rising fish or trying to make a fish rise. Deliver the right dry fly to where fish live, regardless of the season, and they will eat it. The searcher patterns are for the latter, the articulated flies are for the former.”
I asked Nate about his approach to fly design and testing since most of the flies he sells are his own creations. Nate tells me, “First, does the fly have success for the type of water it is designed for? Flies designed for slick surfaces need to work on slick surfaces. Is it tied on the right hook? Does the hook have the right balancing point to allow it to tip up and yet remain supported in the surface film with the wing? These and a lot of other considerations, such as right material, color, shape and size, go into testing both by myself and a select group of anglers that I know are very good dry fly anglers. Overall, it takes about two years of testing per fly.”
I asked Nate how he gets his flies tied. “A few of the larger flies such as the Stimulators are tied overseas. It’s really hard to find tiers willing to tie big, standard dry flies. All the specialized articulated flies are tied by a group of nine American tiers. It’s amazing how many flies a good tier can crank out in a day, 7- to 8- dozen is no problem. One such tier is Janet Schimpf, a brilliant tier of emerging bugs. Her work on our Drake, Hatching, Tantalizer, and Adams Caddis patterns are nothings short of remarkable.”
Janet Schimpf, one of Nate’s star tiers, at the vice.
This brings us to Nate’s business, Dry Fly Innovations, which really markets a solution-based approach to fishing dry flies. As a former teacher, Nate has designed a multi-layered, multi-sensory educational system which includes flies, books and videos, fly tying demonstrations, a subscription blog and fishing reports. All these elements support and encourage anglers who want to be successful with the dry fly. The cornerstone of his business is selling dry flies and if that’s all you ever bought from Nate, he would be fine with that. “But if you’re looking of more,” Nate says, “we offer a whole world of knowledge. My business approach has been three pronged: education, great dry flies and even better customer support.”
The propensity of successful anglers to want to systematize what they have learned and reduce it to a set of principles is inherent to our sport. Many of the great anglers have done it. Some of these systems have contributed greatly to our collective fly fishing knowledge, in part or whole, and some are far too nuanced and complicated to be useful to anyone other than their originator. Nate Brumley’s system is an interesting one if for no other reason than it challenges us to consider what fishing might be like if we had never ‘sniped off the dry fly’.
Let’s face it, dry fly fishing is tough for those anglers who are not practiced. There are similarities to indicator fishing: drag free drifts, mends, and presentation techniques, but the similarities end there. Targeting a rising fish, keeping the fly afloat and drag free, setting up the drift to reach the fish, timing the rises, properly identifying a hatch, casting and overcoming the adrenalin rush which can cause everything to go to hell in seconds—these are the challenges. Many of the clients I guide, some experienced anglers, have never fished a dry fly because it hasn’t been encouraged. As a guide who often relies on sunk flies to get clients into fish, Nates ideas certainly present a huge disruption and challenge to my way of fishing, and I’m not certain I’m ready for it, but I’m intrigued nonetheless. I cannot argue with the fact that dry fly fishing is the most satisfying way to catch a fish. On this point, I think Nate Brumley and our fly fishing tradition has a stake, so I ask myself, as an angler and guide, what kind of stakeholder I want to be both to myself and my clients?
Step 1: Start the thread at a point that marks the front of the abdomen and the back of the thorax.
Step 2: Tie in the tail and flare it with the final thread wrap by lifting and cinching.
Step 3: Attach the biot at the base of the tail and lay a layer of Krazy Glue along the abdomen.
Step 4: Wrap the biot to the back of the thorax.
Step 5: Mount the wing in tightly with a least 12 turns of thread.
Step 6: Apply a fairly long section of dub to the thread. Pull the wing toward the eye and tightly wrap 3 turns of dub behind the wing. The wing should now be straight up. Advance the dub in front of the wing and snap in a small tight ball of dub in front of the wing.
At this point you must separate the clipped ends of elk hair into legs. Pull 10 to 12 hair butts from each side and trim all hair remaining in the middle.
Step 7: The underside of the bug should look like this.
top view
Step 8: Finish the tie by pulling back the legs and dubbing the rest of the thorax. Make sure the dub is tight against the front of the legs. Snap in a tapered head and tie off under the eye.
We tie the Searcher pattern in multiple colors: Black, Brown, Callibaetis, Flav, Gray, Mahogany, Pink, and PMD. By design this fly is not often used over feeding fish. It’s most effective when served to holding water out of the hatch with the objective of luring a fish up to eat. Thus as its name implies, it’s an attractor or SEARCHER pattern.
There is a strategy used when this bug is employed. Match the color of the most prevalent mayfly on the river to the appropriately colored Searcher. The color is the trigger and you’ll often find fish coming blindly to the right colored Searcher.
My first encounter with a tier using unique materials happened when I watched Joe Ayre use silk flowers to create stonefly wing buds. Joe would find old silk flowers at garage sales, then take apart the flowers to use the individual petals for stonefly wing buds. He would then use a wing burner to create uniquely colored wing buds for his stoneflies. He also would use embroidery floss, ribbons, and fishing line to create realistic flies. Watching Joe explore the uses of these materials opened my eyes to search for non-traditional fly tying materials.
There are many places to find non-traditional fly tying materials. A good place to start is at a fabric or craft store. Walk the isles and ask yourself if there is another use for a material. When looking for materials, keep an eye out for items that might work as a fly tying tool. The other way to look for materials is to find substitutes for traditional materials. This approach might be required if the fly recipe calls for a material in short supply or you are not sure what the material is being used. The most important thing is to keep an open mind and do a lot of experimenting.
My search for an improved stonefly wing bud led me to synthetic paper. While working with synthetic paper I also found that it makes a good quill substitute and body backing on nymphs. There are two types of synthetic paper that I have found useful in fly tying—Tyvek and TerraSlate Paper.
Joe’s Realistic Stonefly
Hook: TMC 200R
Tyvek
Tyvek is a synthetic material made of polyethylene fibers. It’s best known for its uses in house wrap and envelopes. It is an extremely durable product that protects houses from moisture and works well shipping items as it doesn’t tear easily. Those same properties make it a versatile fly tying material. Tyvek can be shaped by using wing burners then colored with marker pens, to match local insects. The easiest way to acquire it is to find a used USPS or FedEx envelope that is made from Tyvek. If you know someone who is building a new house, check out construction site to see if there are scrap pieces of Tyvek in good condition. It can also be purchased in sheets from online retailers.
Tyvek is a good substitute for turkey wing buds as it is easier to source and more durable. To create nymph wing buds using Tyvek, you will need Tyvek, marker pens, a wing burner, and a lighter.
Cut Tyvek to the shape of the wing burner. Cut your edge close to the wing burner, because it will leave less of a ridge on the wing bud.
Press the wing burners together tightly, so they grip the paper. Using a lighter, go around the wing burner burning/melting the edges of the paper. Be careful not to heat the wing burner too much as it will melt the wing.
Color the Tyvek using different color markers. Start with a lighter color then continue with a darker color. Blend the two colors using a lighter marker. If you want the edge to stand out, then outline it with a darker color. Play around using different colors and processes.
Before the wing bud is tied in, cut the base of the wing bud to point where it will be tied in. This will create less bulk when tying the bud on the hook.
After the wing bud is tied in, apply a small amount of head cement or nail polish to give the wing bud a little shine.
Examples using burnt Tyvek wings:
Wood’s Golden Stone
Hook: Dai Riki 700B, size 6
Underbody: 2 strips of .30 lead on each side of hook—creating a flat body
Tail: Yellow Goose Biots
Body: Yellow and cream embroidery floss
Legs: Yellow Goose Biots
Wing Buds: Tyvek shaped with wing burners and colored
Antennae: Yellow Goose Biots
McKenzie Stone
Hook: Daiichi 1720 size 8
Tail: Brown Goose Biots
Body: Rust dubbing
Ribbing: Orange Wire
Wing Buds: Tyvek colored brown
Legs: Brown rubber legs
Bead: Gold
TerraSlate
Another synthetic paper that works well in fly tying is TerraSlate Paper. TerraSlate Paper’s motto is “the most durable paper on the planet.” The paper is weatherproof, will not soak up water and is difficult to tear. It is more like a plastic then paper, but it can easily be written on. It comes in four different thicknesses and four different sizes. By using a straight edge and a razor, the paper can be cut in small strips that are used as quill replacements. It also works well for body or thorax backs on nymphs. The paper can be acquired directly from the manufacture by going to www.terraslatepaper.com. They sell sample packs for $3.00 - $4.00 depending on the size and you get a couple sheets of each size of paper. One sheet of paper will tie a lot of flies.
To create synthetic quills, you will need TerraSlate 4mm paper, a razor blade, a flat edge ruler, marker pens, and a cutting surface.
Cut the paper so it is about 5 inches wide. I have found that it is easier to create a taper with a shorter length of paper.
If you want a darker color edge on the quill, then it is easier to do it prior to the paper being cut. Take a marker that has a slightly round edge and run it along the side of the paper that you are going to cut a trip from. Do this on both sides, so it won’t matter which side you use when you tie it on the fly.
Take a straight edge and place it at the top of the paper, tapering it towards the bottom of the paper. The strip should be thin, so it shouldn’t be too wide at the top.
With a sharp razor blade, start from the top and make your cut with one smooth motion and try not to stop while making the cut. Be careful that your fingers are not peaking over the straight edge and in the razor’s path.
Take a marker pen and color both sides of the paper. Let it dry before tying it on a fly. For a mottled look take several different colors and alternate coloring the strip of paper.
Next time you get a Tyvek envelope set it aside and think how it can be incorporated into your favorite pattern or to create a new pattern. Or purchase a sample pack of TerraSlate paper for a couple of bucks and see what you can create. Exploring non-traditional materials is a great way to expand your fly tying abilities.
Nero Nymph – Olive
Hook: TMC 3761, size 8 - 16
Tail: Australian possum body hair
Body: TerraSlate paper cut in a strip and colored with black marker and Copic pale olive (YG95) with thin layer of UV Resin after it is tied in
Thorax: Hare’s Ice Dub – Olive Brown
Hackle: Grizzly hen saddle dyed brown
Bead: Matte Black
A general nymph that can be adapted to match your local hatch by changing the synthetic quill color and dubbing color. If you want a lighter tail color, use the underbody hair from the Australian Possum.
Step 1. Place the bead on the hook. Attach the thread to the hook behind the bead and wrap to the back of the hook.
Step 2. Take a small amount of possum body hair and clean out the underfur. Measure it so it is about ½ the length of the hook. Tie it in at the bend of the hook. Wrap the remaining hair towards the bead, keeping the body as smooth as possible.
Step 3. Take a strip of the TerraSlate Paper and tie it in on the opposite side of the hook. Advance the thread back towards the bead.
Step 4. Wrap the synthetic quill around the hook towards the bead. Wrap the ends next to each without overlapping them.
Step 5.Take a small amount of UV resin and create a small layer over the quill body and cure with a UV light. This process will give the body a glossy look and provide further durability. Make a small dubbing ball behind the bead. Leave a gap between the dubbing and the bead to allow for tying in the hackle.
Step 6. Tie in a hen saddle feather by the tips and take 2- or 3- wraps right up to the bead. Finish the fly by whip finishing the head.
Almost any fly can be tied in a “balanced” form. However, leeches and ‘bugger type patterns are what I usually tie in balanced format.
The fly is simple to tie, yet absolutely deadly at times.
I generally tie it in three general color schemes (black blends, maroon blends, olive blends), and three sizes (6, 8 and 10). It’s important to tie this fly sparsely in order to create translucence and to maximize the movement of the dubbing and marabou fibers in the water.
This fly works best if you tie it to your tippet with a non-slip mono loop knot.
Balanced leeches can be tied in small sizes for typical trout, and can be tied on bigger, heavier hooks for larger trout. For instance, on a trip to Jurassic Lake a couple of years ago I tied them on Matzuo 3x heavy jig hooks in size 6. With these, I landed fish to 19 pounds.
The materials needed to tie a typical version of the pattern are as follows:
Finished Balanced Leech.
George Krumm is the editor for Fish Alaska. He can be reached at george@fishalaskamagazine.com.
]]>
Body: Hot orange Estaz
Hackle: Hot orange marabou wound
Collar: Hot orange dyed guinea fowl
Head: Black
Body: Hot pink Estaz
Hackle: Hot pink marabou wound
Collar: Red dyed guinea fowl
Head: Black
---
Taken from: The Complete Illustrated Directory of Salmon & Steelhead Flies
See an exhaustive list of gorgeous salmon & steelhead flies in a coffee-table style hardbound, beautiful fly pattern book.
]]>
Homework complete, Braden is at home behind his Norvise Rotary Vise.
Though he’s become expert at tying flies from size 30 to billfish flies, his favorites are Blane Chocklett’s Game Changers, Bob Popovic’s Beast Flies, and articulated streamers. Photo by Casey Miller
as long as he finishes his algebra homework - Len Waldron
Braden with a steelhead caught in November 2019 on the annual Team Norvise-Steelhead Alley Outfitters trip in Erie, PA. Pictured with Dan Bennett, a guide with Steelhead Alley Outfitters.
Braden Miller’s fly-tying journey began with a box of hand-tied flies in his pocket and questions in his head. At ten years old, the humble but bold kid from Richmond, Virginia, visited fly shows and walked from booth to booth, talking to anyone who would give him notes on his fly tying.
Now fourteen (at the time of writing 2020), he’s a known quantity on social media and a junior ambassador for a range of fishing companies. This type of early success might lead some teens to bouts of vanity or unrealistic expectations of entitlement, but not Braden, whose fly bench gets shut down if his homework isn’t done.
Braden is part of a fast-growing population of young fly tyers nationwide, but few of Braden’s classmates share his passion.
“Only a few of the kids I go to school with actually go outside, much less fish. For them, it’s ‘video games,’ but for me, it’s ‘where can I catch the next fish.”
Similar to many anglers who got their start very young, it was a woman in his life that turned him on to fly fishing. “My grandmother got me interested in fly fishing, but I think I have been fishing from the time I could hold a rod. Both my parent’s moms really like to fish. I helped my Gram who was interested in fly fishing, and now she owns two fly rods. At first, I used spinning rods and bait casters, but then I found fly fishing and I wanted to learn everything there was to know. After hours of practice in the back yard teaching myself to cast, I decided the next step was to learn to tie flies. When I was eight years old I got a fly tying kit and tied all the flies in the kit, then I started watching videos on Instagram and YouTube.”
On-line videos were a good place to start, but the nuances of materials, construction, thread tension, and the art of insect and baitfish imitation only partially translates over the internet. Seeing a spark of inspiration in their son (he broke his first three budget vises from overuse), Braden’s parents supported his fly tying interests. They started taking him to the Virginia Fly Fishing and Wine Festival every January.
Braden tying a craft fur minnow at Lefty Kreh’s Celebration of Life in 2018 while Temple Fork Outfitters Advisory Staff Member, Blane Chocklett, and fellow TFO Ambassador, Chris Thompson watch.
Year after year, even the giants of the industry such as Lefty Kreh and Bob Clouser began to remember the kid who came back annually.
“The first year they talked to me for ten- to fifteen-minutes. I had a lot to learn and they were guiding me on the basics. The next year it was thirty- to forty-five minutes. The next year we were having hour-long conversations,” says Braden. In 2018, his parents, with some encouragement from Tim and Tyler O’Neill of Norvise, began taking him to fly fishing shows along the Atlantic Coast. In 2017, before Braden was even a teenager, Lefty Kreh went through every fly in his box, critiquing his work, and offering advice.
“Mr. Kreh taught me ‘less is more’. I had to learn to use less hair, be mindful of different hair densities, and understand how hook gaps and materials effect one an - other.”
Braden is confident for his age, but he was reared with southern hospitality and an emphasis on manners and respect for others. This has served him well amongst the frenetic crowds at fly fishing shows.
“When people ask me how I learned to tie flies, I tell them, ‘never be scared to ask questions. Ask lots of questions.’”
Unless someone does something that’s not cool, everyone looks out for everyone else.”
Daily Life of a Fly Tying Prodigy: On the one hand, Braden is a typical teenager with school assignments, friends, and family. But on the other hand, he has a full schedule on the fly fishing show circuit.
Along with his growing notoriety, he’s also fishing a diversity of locations across the country with well-known anglers. And is also an Ambassador for Norvise, Temple Fork Outfitters, J. Stockard Fly Fishing (he recently launched their Junior Pro Tyer Program), among other fishing product manufacturers and outfitters. When school and studies keep him anchored at home, he finds ways to cultivate his knowledge of fishing, particularly its biological basis.
“I helped start a fishing club at my school. We have meetings and tie flies, talk about what’s working, and who is catching fish. We’ve had some really cool speakers come to talk with us and share their knowledge.” But the club’s work became both educational and unique when Braden proposed that his school start ‘Trout in the Classroom,’ a program supported by Trout Unlimited and the Virginia Department of Game & Inland Fisheries.
“We have a 50-gallon tank in our biology classroom where we cultivate brook trout from eggs to fingerlings. Our fishing club members rotate the daily responsibilities of keeping the water clean and the fish fed. In our first year, we struggled with knowing the right time to move the fry from the hatching basket to the large tank. But this year our survival rate is eight-times better. Our tank has two pumps to create a current, a filter to help clean the water, and a chiller that keeps the water between 52- and 55-degrees. The bottom of the tank is gravel, so I can watch how the baby trout move, hide and suspend. It’s taught me a lot about how small fish look and move and I use that information in my fishing and fly tying.” After coordinating with Virginia Fish and Game and Trout Unlimited, the club released the fingerling trout into the South River near Waynesboro, Virginia.
When asked if he’s more of a tyer or an angler, Braden’s answers, “It’s about 51% to 49% for me. I love tying on my vise, and I love watching a fish come up to my fly and devour it.”
According to Tim O’Neill, the owner of Norvise, Braden is special beyond the novelty of his young age.
“Remarkably, Braden ties flies at a level equivalent to someone with 30- to 40-years’ of experience.”
Braden credits his skills to practice and imagination.
He enjoys tying well-known flies such as Blane Chocklett’s ‘Game Changers,’ Bob Popo - vic’s ‘Beast Flies,’ and other articulated streamers. “I look at flies tied by other people and mash-up two older flies to tie something new and different. If I am not catching any fish with the flies I used that day, I’ll go home and tie something new,” says Braden.
This past fall, he tied anchovy flies for one of his passions— False Albacore fishing off the North Carolina coast. Braden participated in the Cape Lookout Albacore and Redfish Festival, which supports Project Healing Waters Fishing, a program dedicated to the physical and emotional rehabilitation of disabled active military service personnel and disabled veterans.
Although he developed his skills on the small freshwater ponds and streams around Richmond, VA, saltwater fishing with larger 8- and 10-weight rods is a welcome and exciting challenge and opens up an entirely new category of fly tying.
“For the albacore, I tie some synthetic Clouser minnows, but I prefer to tie anchovy flies in all white; tan and white; and all tan, each around threeinches long,” says Braden.
Braden Albie fishing with TFO Advisory Staff Member Jake Jordan (Jake Jordan’s Fishing Adventures) off Atlantic Beach, NC.
Though Braden ties a wide variety of flies, he exclusively uses the Norvise Rotary vise.
“I love the full-function of the vise because I tie a lot of larger streamers; it makes tying flies easier and more efficient. I also like how I can switch out the jaw size, depending on what I am tying. It is very easy to spin dubbing and I make custom dubbing brushes using the Norvise dubbing brush table.”
Life on the Road and Braden’s Bucket List “As long as my grades are good, I get to keep fishing and tying,” says Braden, which seems to be all the motivation he needs and makes his parent’s job easier.
His mother plays a significant role in scheduling his event appearances and managing logistics. Most of the time, when he and his mother are on the road, his father stays in town with his three brothers. They try to take the whole family to at least one show per year. His school principal is also flexible.
Though a student on the road for fly tying shows is unusual, Braden always completes all the work he missed. In 2020, Braden will appear at seven fly fishing events from New Jersey to Texas, either on his own or with Norvise as a featured tier in their booth. Braden will also be teaching youth fly tying classes at several shows. Braden has no plans to slow his pace and recently asked his mother, “When I turn sixteen, can I just drive down to Harker’s Island (NC) for the summer?”
While saltwater fly fishing took up most of his time this past summer, the snakehead (channa argus) was his favorite freshwater fish he caught. Non-native to his Virginia waters, the snakehead is an aggressive fish that smashes topwater flies. “Besides my musky from 2018, I have not caught another freshwater fish that gets my adrenaline pumping like a snakehead does.
You can see the wake of the fish from four to five feet away.
When I hook up on one, it goes crazy and my TFO 9-weight rod will be doubled over. I hooked some tarpon in the Keys, and the snakehead is basically the tarpon of freshwater,” says Braden. While Braden loves fishing his home waters, his fishing ambitions continue to expand with his enthusiasm for new experiences and locations.
When asked what’s on his list, Braden has lots to say. “I want to go to Alaska for big rainbow trout on mouse patterns; Belize for bonefish, tarpon, and permit; any kind of billfish on a fly; and South America for peacock bass and Golden Dorado. With no slowdown on the horizon, Braden Miller is on track to make fishing a full-time avocation.
Braden fishing with friend and TFO Ambassador, Andrew Campbell (Captain of Flying Fish Charters) Braden caught his first bull redfish off Harker’s Island, NC. A fractured wrist and growth plate couldn’t stop him from tying flies and fishing
To follow his upcoming adventures, check him out on Instagram @ MillerTimeFlies, on Facebook at Braden Miller and his website at MillerTimeFlies.com.
]]>Unfortunately, that dream is further off than I would like, so I live vicariously through my clients who regularly fish for giant trevally, taimen, dorado, peacocks, and pike, among other species.
They want big durable flies that perform in a specific way depending on how they need or want to fish. I’ve tied articulated birds for GT’s that hunt sea birds in the Seychelles; dorado streamers that push water to get a predator’s attention; and 10-inch long rat flies for taimen.
It’s been a learning process creating durable flies that swim and function according to the needs of my clients, and the fish.
I test and swam my flies for accuracy of movement; stress-test hooks; and never scrimp on quality. Those willing to spend thousands of dollars on fly fishing trip do not want cheap flies to spoil the fish of a lifetime.
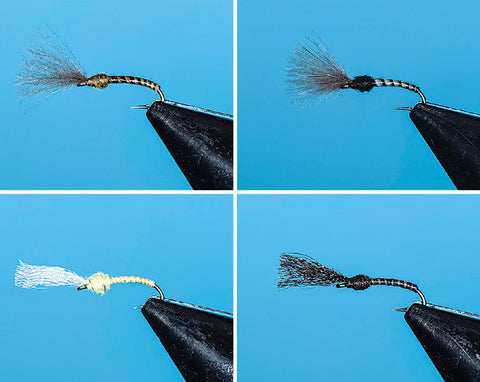
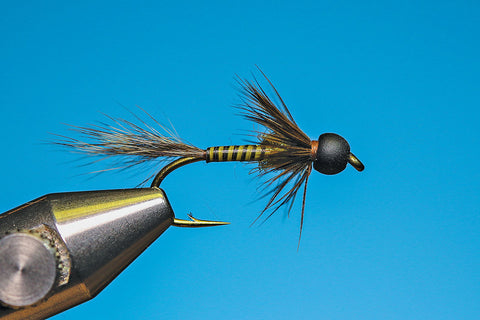
Hook: Gamakatsu SC15-2H size 5/0
Eyes: Extra Large Pseudo Eyes
Tail: EP Fiber Tied in 6” in length and 4” folded back to veil the tail
Tail Wrap: 1/4” of Senyo’s Barred Predator Wrap
1st Body Veil: EP Fiber 3” in length and 3” folded back to veil the tail
Flash: Blend of Flashabou (3 colors used here)
2nd Body Veil: EP Fiber 2 1/2” in length and 2” folded back to veil the tail
Accents: Add here optional Grizzly Saddle feathers
Collar: Complementary or Contrasting EP Fiber 2” in length and
2” folded back to veil the tail
Wing: 10-20 Peacock Herls, curled like ribbon
Lateral Lines: Large Saltwater Lateral Scale
Head: Deer, Elk, or Moose Hair stacked
Step 1: Figure 8 pseudo eyes to bottom of the shank close to the eye of the hook. Add first clump of EP Fiber.
Step 2: Wrap the Predator Wrap around the tail to add barring to the fly
Step 3: Tie in the next clump of EP Fiber veiling around the tail and folding back the butts to continue veiling. Add wing of flash folding the butts back as well.
Step 4: Tie in the next clump of EP Fiber veiling around the tail and folding back the butts to continue veiling. Add as few or many long saddle hackles to add contrast and depth to the fly. (pictured here is four feathers)
Step 5: Tie in the next clump of EP Fiber veiling of the collar and folding
back the butts to continue veiling. Add lateral scale on either side of the fly folding back the butts. Tie in wing of peacock herl as well
Step 6: Stack deer hair on top and bottom of the hook to fill in the space between the pseudo eyes and collar, use lots of hair for a denser finish.
Step 7: Trim with a razor blade to create a bullet shape. The more you trim off the less air is trapped in the head.
The first consideration when tying your own predator flies is the hook. Similar to building a house, if you start with a faulty foundation, the rest of the work you do has an extremely low success rate. There are a few factors to look for when you want the best hook for large, predatory fish. First, there isn’t just one magical hook that you can use. Do you use only one type of hook for tying all your trout flies? When it comes to tying streamers and poppers I have a wide array of hooks that are used for different applications. They are composed of different diameters, shapes, quality, brands, and coatings.
Select a hook for its shape and purpose. ‘Shape’ and ‘style’ mean the same thing and there are a few different styles that I would focus on. The aberdeen bend gives you the most working shank for tying. My deer hair divers and birds are tied on this style of hook. I want the longer working room for stacking hair onto the shank.
Another hook I use a lot is the stinger hook. This can be found in the famous Gamakatsu B10S. It has a short shank and an up-turned hook point. The stinger shape is designed to help increase hookups. When tension is applied to the hook, the point is driven up and into the fish’s jaw, making them great hooks for fish with boney mouths. They work well on articulated flies. The stinger hook has a slightly better keel when they are weightless making them good for attaching weighted eyes to the bottom of the shank. Examples of this kind of fly are the ‘bottoms up’ or ‘season geezer.’
What I call the streamer hook, a cross between the aberdeen and stinger, is another useful hook for several applications. It has the stinger shape in the bend of the hook, but without the upturned point. This gives the tyer more working shank with a reduced chance of bending out for more reliable penetration. The drawback to this kind of hook is breakage.
There is a sharper angle in the hook bend which doesn’t allow it to naturally bend-out without compromising the hook’s strength. Even so, I now use this hook when tying clousers because of the better hook penetration and hold.
The final shape I want to mention is the short shank hook. This has become very popular with those who tie ‘gamechangers.’ Kona released a hook a couple years ago called the Big Game Hunter Hook. This hook is extremely short shanked, coming in at 3/4” (18mm), in the 6/0 size. But when you want great hooking power near the front of the fly, or you want to add a hook in the back of your fly, without adding much length, this is the hook of choice. The short shank hook is very strong and best suited for flies attacked at the head or eaten whole.
Next up for consideration is wire gauge. Based on my experience tying at shows, fishing, and research, hook gauge is under-rated with a vast majority of tiers. Hook gauge can play a major role in hooking vs. stinging a fish. As a general principle: the thicker the wire, the less hook-driving ability. And this also contributes to hook strength. When I’m chasing rockfish on the Oregon coast, I used the Kona BGH hook in a 2/0 for all my saltwater finesse gamechangers. These hooks are very thick for their size, but very strong. This wasn’t a problem until I wanted to use the same hooks for smallmouth bass gamechangers. I lost so many smallmouth bass using the same hooks. I could never drive the hook deep enough to where the fish would stay pinned. I learned the hard way, but hopefully you won’t have to.
It’s common practice for most hook manufacturers plate their predatory hooks with a coating, regardless if it’s designed for saltwater or not. Every manufacturer has their own proprietary alloy with which to plate their hooks. The most common platings are stainless steel, nickel, tin, zinc, or an alloy of the aforementioned metals. I’ll discuss the pros and cons of each and let you decide the best option for your application.
Stainless steel is the most expensive option, but it is the smoothest and strongest. This is a great hook plating when fish have sharp teeth and/or you are fishing saltwater, but not necessary when fish have pads or live in freshwater.
The next best material is tin or a tin/zinc alloy. Both give the hook a shiny, silver appearance. This plating is tough and easy to pick out when you have lots of different flies in your box. The price tag of the hook is better than stainless steel, and only lacks slightly in quality.
The final and most popular type of plating is black nickel. Most low-end and mid-range hooks use black nickel for a sleek, smooth look. However, black nickel has the highest chance of chipping and flaking when the hook shape is compromised. If you tie rough or plan to go after sailfish, billfish, sharks, dorado or tiger fish, you might want to step up your coating quality.
Pink Lady Andino Deceiver
Finally, I want to mention brands. I know there are a lot of brands out there and depending on your geographic location, some brands are more accessible than others.
Daiichi hooks are at the bottom of the list. Not because their hooks are bad, but because they are lacking in size, shape, and coating options. If Daiichi are the only hook your budget will allow, then go for it.
Kona or Tiemco hooks vary wildly in price, but their quality is comparable.
Ahrex or Gamakatsu are the hooks I use for 90% of my predatory flies. All my deer hair flies, and most of my poppers, are tied on Ahrex hooks; streamers are tied on the Gamakatsu hooks.
I use Kona hooks for some applications only because of their many unique and nowhere-else-to-be-found hook shapes.
All this is subjective of course. Many tiers swear by Partridge, Fulling Mill, and other hook manufacturers. As the creator, you have all the power to select the hooks that are best for you and your type of fishing. I always recommend that anglers do their own research and, if you get your flies tied by someone else, don’t forget to ask about what hooks they use or request a specific hook. One of my first clients did that with me. The lodge she went through trusted a specific hook and so I honored that request.
When considering which fly tying materials to use, the simple answer is to use a lot of synthetics, wherever you can. You have been misled if you’re still thinking of synthetics as stiff, sub-par materials. Newer materials have come a long way and many have awesome features not found in natural materials.
EP fibers or polypropylene make excellent tails. In the vise they look stiff and unmoving, but once wet, they flow extremely well and take a beating.
Faux bucktail or synthetic bucktail is great tailing material, not as a replacement to bucktail, but as a new material that can be used when bucktail cannot.
Craft fur is one my favorite materials for its flow, movement, and strength.
The best part of all synthetics is their lack of water absorption and water retention. With one false cast your fly is dry and flying way easier that a rabbit strip streamer.
When compared to natural materials, synthetics offer far more consistency and availability. If I want orange EP fiber, I can get it from any fly shop or online market, with no hassle. Now, if I wanted quality schlappen, that’s a different story. I could go to my local shop and pick through the packs, not finding the right lengths or shape, and then go online and gamble as to what the color shade and quality might be. Synthetics take out all the guesswork. Don’t get me wrong, I still love natural bucktail, but now that fly tying has become more popular and conventional, the good stuff is quickly snapped up by jig makers demanding high grade bucktail and other natural materials.
Stay away from natural materials that are fragile and absorb water, like rabbit hide or downy feathers. Schlappen saddles can be a great material to add contrast and extra movement, but be prepared to have those feathers ripped from the fly long before the fly is completely toast.
To start tying some your predator flies, get yourself a good selection of quality bucktail, deer hair, and EP fiber. With these materials you can tie a bunch of flies that work great, and cast better.
Weighting a fly can be just as tricky as material selection. I have a solution for you that makes it less complicated. Using heavy lead or brass eyes has been the standard if you want flies to sink well. This is the standard for a reason, it works. Andino deceivers are a perfect example of this. I still use heavy eyes for those. For my other flies, I recommend using weightless flies and external worm weights. This creates a modular system for weighting flies. Bullet weights or worm weights come in many sizes to fit any situation. Tungsten is a good option because it is nontoxic and, if for some reason you’re in an area where lead is banned, tungsten would still be allowed. Remember, regulations and laws change even after you book a trip, so don’t be caught with your pants down.
Firetiger Andino Deceiver
Profile, size, and color are just as important as the hook and materials. Now that we have the foundation of the hook and the walls of the materials, what is our house going to look like?
Profile is critical and perhaps the most important aspect to predator flies. Mimic the forage food your fish are targeting and you can’t go wrong. Identify the shape. For instance, shad are flat and tall; chub minnows are tubular; rats are fluffy; crayfish are flat and wide. Get as close to the natural forage food as you can using photos off the internet or from books. There are lots of great resources, most non-fishing related, to draw your inspiration. Perhaps through your research you will find other potential food sources targeted by your species. Taimen like lenok; dorado like sabalo; GT and peacock eat anything they want; and I like a good rib-eye steak. Give the fish what they want and don’t be afraid to try something outside the status quo. All this will help you narrow down the profile you want.
The other option is to hire a tier who has done the research for you and have them tie a matching profile for you.
After profile comes size. Size is a consideration for casting but also matching the size of the natural bait. Small fish can still tackle large flies and visa-versa. Don’t restrict yourself to thinking big fish only eat big flies. A two pound peacock bass can eat a 10 inch fly.
Using synthetics means you can customize your flies on the water with something as simple as a pair of scissors. Fly is too long, wide, or tall? Trim it down and you lose nothing, unlike what happens when you attempt to trim natural materials. I had a client in Brazil that couldn’t get a peacock to commit to eating. After scaling down a seven-inch fly to a four-inches, with a pair of scissors, he was able to get the fish to commit. The four-inch fly better matched the bait of choice.
I’ll go out on a limb here and say color is the least important factor for predator flies. If you are conditioned to fishing for trout, salmon and steelhead, this may take a little rethinking. For predator flies, stick to two shades: light and dark. I love having lots of options in my box when I go to my local waters, but if you want to tie for an upcoming trip, keep things simple. Black is the go-to dark color; great for tanic or muddy water, and low light. Light colors such as chartreuse and orange are great choices for bright days and bright water. When I tie client flies I usually have six color options for people to choose from, but I often keep it very simple. One group of anglers I tied for wanted only black and white poppers. They worked great and kept my fly tying simple. I do know guys who swear by colors. Steelhead guys swear by green or pink; some dorado guys love blue or yellow. Just have a few staples in the box and a few fun ones to see what happens.
Various Bulkhead Deceivers.
Given everything we have discussed, how do you put it all together, and keep it together? Durability is key when going after toothy, exotic predatory fish. You can skip this part of the article if you think spending $10-$15 on a fly from a global manufacturer that lasts only one fish is a good deal. But if you are like me, and tying on a new fly after every fish is not your idea of fun, then read on.
Here are a few tips I give anyone who wants to tie stronger flies.
Super glue is your friend. Used it in moderation, it will hold a fly together when it should have given up six fish ago.
GSP or gel spun polymer thread is the toughest around. I like 100-200 denier for all flies that see teeth. 200 denier GSP is so strong you can’t cut it with regular scissors.
Fold-over your material to lock them into place. This applies mostly to hackle stems and synthetic fibers. This will prevent your materials from getting pulled out when a fish is giving you violent head shakes.
Finally, if you use UV resin, please bake it. Consider using either a UV tank or set your flies outside to soak in the sun’s rays. A UV tank is a box with loads of UV lights and reflective material. Both methods will cure the resin 100%. A high watt light in your home will only get you to 80-90% cure. Thirty minutes in the tank or outside gets it the rest of the way.
I could have gone on for many more pages, geeking out about hooks, materials, profile, color, durability, and even more, but this will get you started in the right direction.
Now get out there and tie flies for your next trip or use this article to ask the right questions and find a capable tier for your next trip, no matter where or how exotic it is.
- written by Garrett Lesko
]]>
His patience is stressed beyond acceptable. Constantly rising trout taking what he believes are dragonfly nymphs hatching in the surface tension.
His fly boxes show no close imitations.
Necessity being the mother of invention, he seats himself at his traveling fly tying kit and shortly removes an acceptable fly from the vise.
The fly has a short stubby tail of groundhog tail hairs. A body of the same is wound around the hook shank. The black waxed linen thread becomes a ribbing wound in reverse.
Groundhogs were in great abundance at the time. Their tail hairs were used in flies after Bill nation used it in the Grey Nymph and Green Nymph. The original Halfback wore a tail, wing case, and legs of the same product.
Then finally the primary ingredient of the formula - two saddle hackles from a Ring Neck Chinese Cock Pheasant hackle wound full and tips flowing to the end of the fly.
These feathers are reddish-brown, brown, flecked grey, and some with shades of green, all acceptable.
The fly became one of the most popular in B.C. and reached lakes in the distant corners of the Northwest and Western Prairie Provinces and States.
The British Army colonel brainchild whose name was attached to the fly was Carey.
His first name is not known, but Tom has been advanced with no validation. The original name of the fly was “The Dredge” based on one of the methods of fishing it. At the same time, “The Monkey Faced Louise” name surfaced for unknown reasons, as there seems to be no relationship in appearance, and certainly not to
the method of fishing it.
In some places, it is shown as “The Carey’s Special,” the apostrophe showing possessive credit. I have been tying and fishing this fly just shy of 60 years and it has always been “The Carey Special” to me.
Much speculation once circulated about the history. Major Tommy Brayshaw, a retired British Army Major, set forth the possibility of the Chinese Pheasant saddle hackle having been seen before by the Colonel in the Pazooka or Knouff Lake
Special.
This pattern has a lighter dressed hackle, using only two turns of a single feather.
Today this fly is seldom seen in the fly boxes of the current crop of fly anglers. The trend for some 30 years is the exact imitation and the questionable injection of plastic and other synthetic materials. The fly still performs in all its forms.
To establish a time frame of the development and variations of the fly would be difficult, if not impossible. However, challenges like this I try to take head-on.
To further illustrate this, a challenge came to find a wife who enjoyed fly fishing as
much as I; was a capable a fly caster, and reader of hatches and water; and enjoyed the difficult task of taking the Atlantic salmon on the fly. I was successful, so I will try this.
The first pattern was the version with groundhog hair. Next came the “Self Carey” or the “Self-Bodied Carey”.
Only one type of feather was used for the hackle, tail, and body.
The body of brown wool would fit in here.
Next, the Olive Chenille and Peacock Herl bodies. This is a good version.
Then came the rainbow versions: green, red, yellow, silver and gold tinsel.
Everyone with a fly tying vise has had their own “Special Carey”.
Originally, and for a good reason, this fly was called “The Dredge.” At the time of origination, floating and sinking lines had to wait another 25 years to be invented.
However, the idea is to sink the fly close to the bottom. Retrieve in 4”-5” pulls letting it settle between pulls dredging the bottom areas. Trolling is best in a boat that is rowed. Pull on the oars, wait; another pull, stop. Both of these methods do one thing, make the hackle compress tightly then open on the stop. This causes undulation of the hackle.
No matter the color or material of the body, the common thread to all versions is the long hackle and the undulation factor. My favorite version is the Peacock herl body. There is something magical to Rainbow trout about the iridescent sheen of
Peacock herl.
Original
Hook: #6 wet fly hook
Thread: Black- 3/0-6/0
Body: Groundhog tail wrapped on hook shank
Ribbing: Coarse black thread wound reverse
Tail: Groundhog tail hair, short
Hackle: two large Chinse Ring Neck Pheasant saddle hackles wound full
Self-Carey
Body: Pheasant saddle hackle feathers
Tail: same as body
Hackle: as original
- written by Bill Jollymore
]]>Included in one article was a quote from Bill’s 1972 diary, “I’ve recorded a series of flies and matching methods resulting in a single season high of 218 steelhead coming to my patterns during the 1972 season, 85 being landed and most of them released.”
Imagine the thousands of anglers reading this quote and thinking to themselves, “Who is this guy?”
I remember when that issue of STS came out and the stir it created. In 1975, Bill wrote another article in the June/July issue of STS about a new angling method for both summer and winter steelhead.
This method was similar to the one that A.H.E. Wood had pioneered and described in his 1935 book Greased Line Fishing for Salmon under the pen name of Jock Scott. For several years, Bill had been testing, perfecting, and adapting earlier British salmon fishing techniques to the rivers of the Pacific Northwest.
The flies Bill developed between 1971-1973 and wrote about in 1975 were the Winter’s Hope and the Paint Brush, both dressed with purple hackles. When Bill visited my home recently, I had the opportunity to ask him how he created these two purple patterns.
“In 1971 I purchased the new book Atlantic Salmon Flies and Fishing (1970) by Joseph D. Bates but I never wanted to tie a full-dress salmon fly. Instead, my idea was to look for patterns I could simplify and use for both winter and summer steelhead here in the Pacific Northwest.
I was hoping to discover something I might profit from by studying the flies and fishing methods of centuries-old anglers with similar rivers and fishing conditions on the other side of the pond. Three patterns struck me as fishable in a much reduced form; the Silver Doctor, the Silver Wilkinson, and Preston Jennings’ Lord Iris.”
I asked Bill what attracted him to purple hackles when so few of the classic old European salmon fly patterns or Northwest steelhead flies of the time called for purple materials?
Bill said, “I like the notion that blue and purple shades are the least impacted by the reduction in available sunlight because they are at the shortest end of the light spectrum. At the other end of the spectrum were the tried and true reds, oranges, and yellows.
I wanted to develop patterns that incorporated all of these colors in a harmonious way. But it wasn’t easy. In those days purple hackles were hard to locate, and for that matter, I needed large enough hackles for 2/0-5/0 hooks that I intended to use with the grease-line methods.
The only fly shop near my SW Washington home was the new Greased Line Fly Shop in Lake Oswego, Oregon. There I found large turquoise hackles and a box of 5/0 hooks I desperately needed for winter steelhead holding in the deep pools.
Later, the large neck hackles I ordered from Dick Staiger arrived in the right shade of purple to blend with the new blue hackles.” And with that, we witness the birth of a new fly pattern.
I made the comment to Bill that the Winter’s Hope certainly has all the right colors that work in concert with each other and it is visible to the fish under all light conditions. It’s still very popular today after forty-five seasons of use.
Bill agreed, “I’ve learned to judge beauty in different ways, not the least of which is the beauty of efficient function. I tie flies very slowly, so the less materials and steps involved, the better.”
As Bill was leaving my home he took another look at a photograph he enlarged for me 39 years ago which was recently framed by my friend Sean Dahlquist. The photo is a close-up shot of two of his low water Steelhead Silver Doctors and a Lady Caroline lying next to a gorgeous cane rod and vintage hardy reel. “Can’t tie like that anymore,” Bill chuckled.
One of my earliest purple-colored steelhead flies is an odd-looking critter, half-way resembling a Comet with a long tail of brightly colored hair, but with the hackles and wings of a Silver Hilton. This pattern was created streamside in February 1976 while watching the river rise and turn cloudy. The fly tied to my leader was my old favorite, the Brad’s Brat. Standing in the shallows, I dropped the Brat in and watched it disappear in less than two feet of water. I needed a pattern with both bright and dark colors which would make the fly more visible to the moving fish. The resulting fly took one steelhead that evening. The next day found me fishing about three miles up from the river’s mouth. High tide was mid-morning and by 11:00 AM I had landed my first steelhead. Two more fish followed in the next
two- hours. A week later, seven steelhead surrendered to this pattern, including a beautiful buck of just under twenty- pounds. I named the fly the Spawning Purple, and today the pattern can be tied in many variations. My approach is to tie the tail and body in spectral colors like pinks, blues, and reds, but the hackle and wings are kept in shades of purple. The two-tone colors of the Spawning Purple are more effective any time the river is off-color, whether fishing fall steelhead in British Columbia after a spate or throughout winter weather.
John Shewey, who was working at my shop at the time and chasing steelhead nearly every evening after work, developed a retooled version of this pattern that uses the same general color scheme, but is much more trimmed down for summer run fish and low water conditions. An orange-dyed Golden Pheasant crest replaced the long tail of orange polar bear on the original, and fluorescent orange floss was used instead of a thickly dubbed body of seal fur. Four separate spikes of purple marabou tied-in along the front half of the shank replaced the sections of polar bear hair. John’s fly was similarly named which has created some confusion over the years. It was originally called the Spawning Purple Spey because the very earliest version of this fly sported a pair of peacock secondary wing quill segments tied in like a Dee-type wing, as well as a few turns of long, flowing heron at the throat.
Over time the strip wings and the throat of heron hackle were dropped and the dressing was simplified, yet the fly still carried the name “Spey”. For the sake of clarification it has since been renamed Shewey’s Spawning Purple.
If you thought the Spawning Purple was an odd-looking fly, this next pattern takes first place, and with good reason. The Purple Polar Bear Matuka was a creation between myself and Forrest Maxwell in July 1978. We first met when Forrest walked into in my fly shop to look around. At that time he was new to fly fishing, but was very good at other forms of angling. With his high-intensity personality he quickly became an expert at anything he did, including fly tying. As Forrest began spending more time at the shop I began teaching him how to tie flies, including Matuka-style patterns.
He watched as I cranked out a sample Matuka for him using fluorescent purple hackles and then I left him to practice tying on his own. Previously I had also dyed up a thin strip of polar bear hair the same shade of fluorescent purple, so I sat down at the vise to try my hand at creating a hairwing version. My thinking was that perhaps a hairwing fly would be effective as and certainly more durable than the featherwing version.
Forrest and I finished our Matukas; his dressed with hackles, mine with hair. The next day we were together on the North Fork of the Santiam River at daybreak. In those days, this beautiful river located just east of Salem, Oregon contained huge numbers of hatchery summer steelhead. I took several steelhead early in the morning but had to leave to open up the fly shop. Forrest was able to continue fishing and ended up also landing four- or five- fish.
The verdict: both the featherwing and the hairwing version of the Purple Matuka are great flies.
Among the thirty or so purple patterns I’ve created over the last 45 years, this has been my most reliable “go-to” fly when it comes to taking summer steelhead.
I do feel that the Matuka hairwing has an edge over Matukas tied with wings of rooster hackles. It has a broader profile and a better overall silhouette, making it remarkably visible from daybreak until dark. Another advantage of the hairwing version is that it also has lots of movement, even in slower currents.
For these reasons, it is an excellent searching pattern which suits my style of fishing.
I try to cover a lot of water quickly, looking for players, and reducing the number of casts needed to produce a strike. If there’s a fish there, it’s probably going to grab my Matuka.
Many others besides myself have observed that steelhead come to this pattern fast and without hesitation. The hairwing Matuka never as popular as the featherwing version and this may be due to the scarcity of polar bear hair and jungle cock cheeks. At the time, it was easily the most expensive fly in my shop. But even if the materials were available, the fact remains, the hairwing version takes twice as long to tie, even for expert fly tiers. For these reasons it was virtually unknown outside of my local area, although a few angling friends reported phenomenal success fishing Polar Bear Matukas up to four-inches long in the famous British Columbia steelhead rivers.
The 1979 edition of Kaufmann’s Streamborn Fly Shop Catalog features about thirty subsurface steelhead patterns. They represented the most popular steelhead flies in the Pacific Northwest at that time, and yet only two of them are purple, the Del Cooper and the Purple Peril.
That same year, Randall Kaufmann and his brother Lance purchased a home in Maupin, Oregon on the Deschutes River as a way to expand their business into guiding and fly fishing schools. Within a few years Randall had crafted four purple steelhead flies: the Freight Train, Signal Light, Purple Flash, and Ferry Canyon.
Thousands of dozens of these highly effective flies were sold and fly tiers
began developing more purple patterns. I believe Randall Kaufmann was the one angler / tier most responsible for the expansion of purple-colored flies through his shop’s extensive catalog sales during the 1980’s.
Flowers are most often my inspiration for all the colors of the spectrum. Even though purple is not a spectral color, but a mix of many spectral colors from, pinks,blue’s and reds.
Almost four decades later, purple-colored flies and materials are now abundant in the fly fishing world. It’s amazing to see how this color went from total obscurity to absolute domination of the color palette for steelhead flies and has become a solid color for trout as well. Many purple trout patterns are now popular today, from the purple Quill Gordon to the purple Chubby Chernobyl.
Anglers have asked me for years what makes purple-colored flies so effective. My reply is that Purple is close to black, but not quite. It has a strong reflective color that other dark colors often lack. I’ve been told by my customers that solid strikes come far more often to purple patterns, and this has been my experience as well.
- written by Dave Mcneese
]]>This old adage should always be in the back of the fly tier’s mind.
Although most of us may never achieve “perfection,” we should always be aiming to improve our tying. Whether your goal is to tie faster, to construct stronger and more durable flies, or to create works of art fit for framing, achieving success requires putting time in at the bench.
I’ve been tying flies for 12 years now, and have had countless hooks in the vice. Along the way I have amassed a large collection of rejected flies that I keep in a drawer to eventually be razored so as to reclaim their hooks. Every once in a while, I grab some of these scrap flies out to examine. I am often a little embarrassed at these crude old ties. It is easy to notice the poor techniques used or proportional errors, but this is actually encouraging. It means that my tying has been improving over years and inspires me to keep at it.
The majority of my time tying flies has been devoted to Northwest style steelhead flies, in particular Steelhead Speys. These are slim, sleek patterns that require specific materials and techniques in order to help achieve their signature profile, the one that makes you say “that looks fishy!”
I am often asked about the approach I use when tying in hackle tip wings that allows them to lay low over the body. When tying these patterns, it is important to remember that all preceding steps can either help or hinder each following step.
Managing one’s thread wraps is also of great importance. It is critical to use enough wraps to ensure that the materials are securely tied in, but there comes a point when continuous wraps will only add excess bulk as well as hindering your chances of tying a neat, tidy fly.
When working with collar hackles I always tie them in by the tip and generally find that 3 to 5 wraps is plenty to hold them in place. To ensure the hackle has been properly secured you can use wraps over top and directly behind the stem to lock it in place.
Having a few wraps of thread laid down as a base to tie over and using a well waxed thread can also be helpful. I always grab the butt end of the hackle and give it a pull to make sure that it doesn’t unseat from the tie in point. It is especially helpful to tie the collar hackle in by the tip on the far side of the shank, taking a turn and a half, and then tying it off on the near side of the shank. This gives the desired fullness to the underside of the fly while leaving less fibers and hackle stem on top which can interfere with your wing set.
At this point the tier has several options in front of them when choosing the components and look of their hackle tip wing. How long the wing is and how wide the hackles are is a matter of personal preference. I like a wing that is not too skinny nor too wide, with tip ends reaching just shy of the bend of the hook. Wings typically consist of 4 hackles. 2 rights and 2 lefts. I prefer to use hackles from rooster capes rather than saddle hackles.
The ideal winging hackles come from the right and left side of the skin as they have a complimentary curve, but straighter center feathers can be trained to curve in the desired direction by gently running your thumbnail through the feather along its stem. There are innumerable ways to seat hackle tip wings and many work great.
The technique I use is a simplified version of the “Z” bend which involves crimping a Z-shape into the hackle stems at their tie-in point, to allow them flow up and over any lumps of hackle stem or body material to keep them low and lying flat. Instead, I simply group the wing hackles together firmly and run my thumbnail along the bottom of the stems and slightly up into the first few fibers at the base of the wing. This creates a small curve at the tie-in point and forces the wing to ride down along the body when secured.
Remember to rotate your vise to view the fly from directly above to make sure the wing is set straight on top of the hook so that it will swim correctly. For more durability you can fold the hackle stems back or even down through the return eye and lash them under with further thread wraps to ensure that they are firmly secured. Adding a coat of thin penetrating head cement guarantees your fly will withstand a hard day’s fishing.
Another method that I sometimes use allows for an easy, low wing set while simultaneously adding an extra dynamic to the fly. By tying in a small bunch of bucktail, calf tail, or even flashy synthetic material before the hackle tip wing is tied in, you provide a base along which the hackles will lie nicely. This allows for the hackles to be easily held in place and the underwing will give added color to the wing and have a separate action in the water. This can also provide a stabilizing effect to the fly as it is fished; with more material on top of the fly, the better overall balance of materials and less tendency for it to lay over on its side as it swings through the current. You may choose to use only a single hackle tip on each side of the underwing to accentuate translucency.
Not only do flies with hackle tip wings fish well, they look striking and offer the tier innumerable opportunities to experiment.
The rooster neck hackles used to create these wings possess a shine that both the fish and fishermen find very attractive, and in addition they take dye beautifully. Hackle tip wings can consist of several pairs of hackles, so by layering badger or grizzly patterned hackles in amongst the dyed hackles one can come up with some truly eye-catching patterns.
Step 1: Spey fly ready to be winged.
Step 2: Tie in a small bunch of translucent hair.
Step 3: Select 1 or 2 neck hackles tie them in to envelope the hair.
Step 4: Hackle tip laying properly along underwing.
Step 5: Ensure the wing is set correctly over the body.
Step 6: Finished Fly.
When I first started tying steelhead flies, I found it difficult to tie without copying a pattern from a book and following its recipe exactly.
Today, if I am not tying one of my own patterns, I am tying variations of favorite old flies. Taking a classic pattern and changing its characteristics by utilizing different materials is a fun way to experiment and build on one’s creativity as a fly tier.
An excellent way to find inspiration is to look over your various skins, particularly pheasant and waterfowl, searching for interesting feathers not typically used in steelhead flies and then making a point to tie with them. Another great motivator is to study the patterns of favorite tiers. I’ve highlighted a Syd Glasso style wet fly as a perfect example of inventive pattern revitalization. One of Syd’s favorite fishing flies was the tried and true Polar Shrimp, which he tied in a number of variations.
Step 1: The collar hackle is ready to be tied in.
Step 2: Attach the collar hackle on the far side of the hook along the shank.
Step 3: Take 1 and a half turns and tie the hackle off on the near side of the shank.
Step 4: Match up 4 neck hackles.
Step 5: Run your thumb nail along the under side of the wing stems and slightly up into the base of the wing.
Step 6: Ready to tie in.
Step 7: Insert the hackle stems into the eye and bind down the wing.
Step 8: The wing is set.
A Syd Glasso tail could consist of varying lengths of Golden Pheasant tippets with a few orange or red hackle fibers mixed throughout.
In place of a standard body of orange chenille, Syd might wrap a fine silk body, splitting his silk half way up and inserting hot orange seal fur for the second half, and then spiral over it a few turns of flat silver tinsel. A collar of brightly colored Golden Pheasant flank would replace the typical orange saddle hackle, and in place of a white bucktail wing Syd would strip off long white rooster hackle fibers and tie them down in a bunch, creating a free-flowing wing that would have great action in the water. The end result is a unique wet fly that holds true to the overall nature of a Polar Shrimp but has a life of its own. Syd’s innovations knew no bounds and he seemed to always be looking for new ways to utilize feathers and furs.
Creating, experimenting, studying, and collecting. You can never have enough feathers and furs, or books and magazines on tying and fishing. You can never tie enough flies!
]]>I’ve highlighted a Syd Glasso style wet fly as a perfect example of inventive pattern revitalization. One of Syd’s favorite fishing flies was the tried and true Polar Shrimp, which he tied in a number of variations.
The original pattern calls for a tail of red hackle fibers. A Syd Glasso tail could consist of varying lengths of Golden Pheasant tippets with a few orange or red hackle fibers mixed throughout. In place of a standard body of orange chenille, Syd might wrap a fine silk body, splitting his silk half way up and inserting hot orange seal fur for the second half, and then spiral over it a few turns of flat silver tinsel.
A collar of brightly colored Golden Pheasant flank would replace the typical orange saddle hackle, and in place of a white bucktail wing Syd would strip off long white rooster hackle fibers and tie them down in a bunch, creating a free-flowing wing that would have great action in the water.
The end result is a unique wet fly that holds true to the overall nature of a Polar Shrimp but has a life of its own. Syd’s innovations knew no bounds and he seemed to always be looking for new ways to utilize feathers and furs.
Step 1: Attach a length of flat silver tinsel.
Step 2: Select a nice Golden Pheasant tippet feather.
Step 3: Sweep several fibers down to mix the fiber lengths.
Step 4: Ideal patterning and tail shape.
Step 5: Tie in the tippets and a few red hackle fibers for a tail.
Step 6: Wrap a length of hot orange floss down and back.
Step 7: Split the remaining floss and insert a sparse amount of hot orange dubbing.
Step 8: Twist the floss to lock in the dubbing and wrap up towards the eye leaving plenty of room for the collar and wing.
Step 9: Take 3 turns of tinsel.
Step 10: Wrap a few turns of Golden Pheasant flank for a collar.
Step 11: Select a large white rooster neck hackle.
Step 12: Peel off a small bunch of fibers for a wing.
Step 13: Place a dab of head cement to the butt ends.
Step 14: Tie in the wing and whip finish.
]]>