
Exploring Synthetic Paper - Garren Wood
One of the joys of fly tying is finding new materials to create unique flies. A new material might give that older pattern a unique look that will be more alluring to a fish. Many newer materials are easier to tie with and more durable than older materials. There are also times when a new material simply does not work for the intended application. Regardless of the outcome, the education of working with new materials teaches us a lot about the application of materials, even when it fails.
My first encounter with a tier using unique materials happened when I watched Joe Ayre use silk flowers to create stonefly wing buds. Joe would find old silk flowers at garage sales, then take apart the flowers to use the individual petals for stonefly wing buds. He would then use a wing burner to create uniquely colored wing buds for his stoneflies. He also would use embroidery floss, ribbons, and fishing line to create realistic flies. Watching Joe explore the uses of these materials opened my eyes to search for non-traditional fly tying materials.
There are many places to find non-traditional fly tying materials. A good place to start is at a fabric or craft store. Walk the isles and ask yourself if there is another use for a material. When looking for materials, keep an eye out for items that might work as a fly tying tool. The other way to look for materials is to find substitutes for traditional materials. This approach might be required if the fly recipe calls for a material in short supply or you are not sure what the material is being used. The most important thing is to keep an open mind and do a lot of experimenting.
My search for an improved stonefly wing bud led me to synthetic paper. While working with synthetic paper I also found that it makes a good quill substitute and body backing on nymphs. There are two types of synthetic paper that I have found useful in fly tying—Tyvek and TerraSlate Paper.
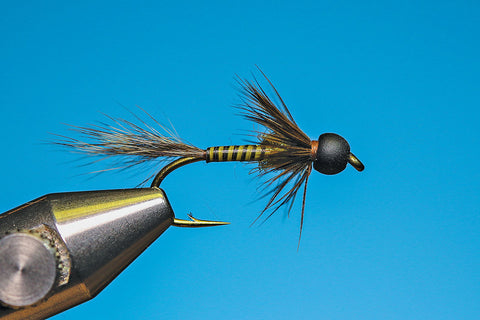
Joe’s Realistic Stonefly

Underbody: Strip of leather in diamond shape tied on top of hook
Tail: Fishing line with burnt tips
Body: Black and White DMC Embroidery Floss
Legs: Goose Biots
Wing Buds: Silk flower shaped using a wing burner.
Antennae: Fishing line with burnt tips
Tyvek
Tyvek is a synthetic material made of polyethylene fibers. It’s best known for its uses in house wrap and envelopes. It is an extremely durable product that protects houses from moisture and works well shipping items as it doesn’t tear easily. Those same properties make it a versatile fly tying material. Tyvek can be shaped by using wing burners then colored with marker pens, to match local insects. The easiest way to acquire it is to find a used USPS or FedEx envelope that is made from Tyvek. If you know someone who is building a new house, check out construction site to see if there are scrap pieces of Tyvek in good condition. It can also be purchased in sheets from online retailers.
Tyvek is a good substitute for turkey wing buds as it is easier to source and more durable. To create nymph wing buds using Tyvek, you will need Tyvek, marker pens, a wing burner, and a lighter.

Cut Tyvek to the shape of the wing burner. Cut your edge close to the wing burner, because it will leave less of a ridge on the wing bud.

Press the wing burners together tightly, so they grip the paper. Using a lighter, go around the wing burner burning/melting the edges of the paper. Be careful not to heat the wing burner too much as it will melt the wing.

Color the Tyvek using different color markers. Start with a lighter color then continue with a darker color. Blend the two colors using a lighter marker. If you want the edge to stand out, then outline it with a darker color. Play around using different colors and processes.

Before the wing bud is tied in, cut the base of the wing bud to point where it will be tied in. This will create less bulk when tying the bud on the hook.
After the wing bud is tied in, apply a small amount of head cement or nail polish to give the wing bud a little shine.
Examples using burnt Tyvek wings:
Wood’s Golden Stone

Hook: Dai Riki 700B, size 6
Underbody: 2 strips of .30 lead on each side of hook—creating a flat body
Tail: Yellow Goose Biots
Body: Yellow and cream embroidery floss
Legs: Yellow Goose Biots
Wing Buds: Tyvek shaped with wing burners and colored
Antennae: Yellow Goose Biots
McKenzie Stone

Hook: Daiichi 1720 size 8
Tail: Brown Goose Biots
Body: Rust dubbing
Ribbing: Orange Wire
Wing Buds: Tyvek colored brown
Legs: Brown rubber legs
Bead: Gold
TerraSlate
Another synthetic paper that works well in fly tying is TerraSlate Paper. TerraSlate Paper’s motto is “the most durable paper on the planet.” The paper is weatherproof, will not soak up water and is difficult to tear. It is more like a plastic then paper, but it can easily be written on. It comes in four different thicknesses and four different sizes. By using a straight edge and a razor, the paper can be cut in small strips that are used as quill replacements. It also works well for body or thorax backs on nymphs. The paper can be acquired directly from the manufacture by going to www.terraslatepaper.com. They sell sample packs for $3.00 - $4.00 depending on the size and you get a couple sheets of each size of paper. One sheet of paper will tie a lot of flies.
To create synthetic quills, you will need TerraSlate 4mm paper, a razor blade, a flat edge ruler, marker pens, and a cutting surface.
Cut the paper so it is about 5 inches wide. I have found that it is easier to create a taper with a shorter length of paper.
If you want a darker color edge on the quill, then it is easier to do it prior to the paper being cut. Take a marker that has a slightly round edge and run it along the side of the paper that you are going to cut a trip from. Do this on both sides, so it won’t matter which side you use when you tie it on the fly.
Take a straight edge and place it at the top of the paper, tapering it towards the bottom of the paper. The strip should be thin, so it shouldn’t be too wide at the top.
With a sharp razor blade, start from the top and make your cut with one smooth motion and try not to stop while making the cut. Be careful that your fingers are not peaking over the straight edge and in the razor’s path.
Take a marker pen and color both sides of the paper. Let it dry before tying it on a fly. For a mottled look take several different colors and alternate coloring the strip of paper.
Next time you get a Tyvek envelope set it aside and think how it can be incorporated into your favorite pattern or to create a new pattern. Or purchase a sample pack of TerraSlate paper for a couple of bucks and see what you can create. Exploring non-traditional materials is a great way to expand your fly tying abilities.
Nero Nymph – Olive
Hook: TMC 3761, size 8 - 16
Tail: Australian possum body hair
Body: TerraSlate paper cut in a strip and colored with black marker and Copic pale olive (YG95) with thin layer of UV Resin after it is tied in
Thorax: Hare’s Ice Dub – Olive Brown
Hackle: Grizzly hen saddle dyed brown
Bead: Matte Black
A general nymph that can be adapted to match your local hatch by changing the synthetic quill color and dubbing color. If you want a lighter tail color, use the underbody hair from the Australian Possum.

Step 1. Place the bead on the hook. Attach the thread to the hook behind the bead and wrap to the back of the hook.

Step 2. Take a small amount of possum body hair and clean out the underfur. Measure it so it is about ½ the length of the hook. Tie it in at the bend of the hook. Wrap the remaining hair towards the bead, keeping the body as smooth as possible.

Step 3. Take a strip of the TerraSlate Paper and tie it in on the opposite side of the hook. Advance the thread back towards the bead.

Step 4. Wrap the synthetic quill around the hook towards the bead. Wrap the ends next to each without overlapping them.

Step 5.Take a small amount of UV resin and create a small layer over the quill body and cure with a UV light. This process will give the body a glossy look and provide further durability. Make a small dubbing ball behind the bead. Leave a gap between the dubbing and the bead to allow for tying in the hackle.
Step 6. Tie in a hen saddle feather by the tips and take 2- or 3- wraps right up to the bead. Finish the fly by whip finishing the head.

Hi Garren – Its been a while since we communicated. I stumbled across this article while surfing and although it seems strangely familiar, I wanted to let you know that there are several manufacturers of what I will call highly durable, highly water resistant paper that takes a marker or can be written on even when the surface is wet. Most are marketed as paper for individuals in industries where they need to make notes while outside and can do so despite the fact it may be raining. I did some research and located several who offered to provide all inquiries with several sample 8.5 X 11 sheets of each thickness and type of paper they make. I now have enough for quite a while. BTW – love the Nero!